
One of the things that I love to do during the summer (and all year long) is to go the South Tampa Farm. I love this place!!! There's so MUCH to love! But, today I am going to describe just the process of making butter. This is a dairy farm with anywhere between 15-20 cows...calves of all ages, meat cows/steer, milking cows, and a one "happy" bull. And, obviously, this butter starts with milk and that comes from these cows.
 |
| Nursing Cow |
Twice a day the cows get milked...approximatley 4:30 or 5:00 AM and again in the PM. The farm only sells milk that is one day old. The next day, the "old" milk gets removed from the merchandising case and is replaced with the new day's milk.
 |
| Today's Milk |
The milk that didn't sell within one day, is returned to the "milk room" and placed on a lower shelf. (I'm not sure why this milk says "12 Nov." because it's June. Someone must have been a little off their game when it came time to label these.) The "old" milk is destined to become a variety of other farm goodies: kefir, whey, cottage cheese, ricotta, mozzarella, yogurt, etc. (Nothing goes to waste!) To make butter, the cream must be skimmed. As you can see in this photo there's a lot of lovely cream at the top of these gallon jugs.
 |
| "Old" Milk |
Although this farm is very old fashioned and simple, it is NOT so old fashioned that we actually skim the cream with a ladle. We use this device that separates the cream from the skimmed milk. You plug in the machine, pour the milk into the silver bowl on top, and from one spout flows the cream and from the other spout...out comes skimmed milk. (The skimmed milk become cottage cheese.) The cream gets bottled up and returned to the refrigerator to ripen a bit.
 |
| Cream Separator |
We have tried to make butter from cream that was separated that day, and it just doesn't "make". Cream that has been aged and/or has soured, actually turns into butter much more consistently. The night before, the cream gets set out to warm up to room temperature and further the ripening process.
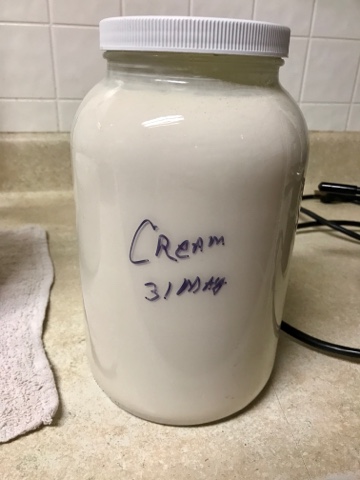
This collection of cream has some that is two weeks old and some that is just a few days old. So, the solution is to mix these together to get something that is a little bit of newer and a little bit of the older. (The more you even all the components, the more likely things will work out.)
 |
| Five and a Half Gallons of Cream |
The work area gets a bleach water misting and a thorough wiping. (I imagine customers think it's important to start with things as clean as possible.)😉

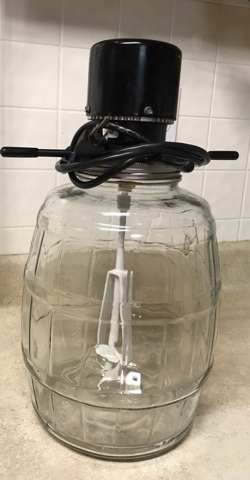
Again, this farm is old fashioned, but not so old fashioned that we actually churn the butter by hand. We use this "new fangled" yet slightly antique electric churn.
To assist in the processing steps, I also use super fine cheese cloth and butter paddles (also knowns as Scotch hands).

Soak these in cool tap water while the first batch of cream is churning. This helps the butter not stick to the paddles and the cheese cloth.

The butter churn works best with a gallon and a half of cream. I've tried more...there's not enough room for the churn to do the work it needs. I've tried less...there's not enough liquid to really make the churn have good contact with the cream.

Remember to mix up the older and the newer cream!
This is what the older cream looks like. It's not "sour" but it's just got the perfect amount of ripening so that it has gotten a wee bit golden and has thickened up some.

Pour the cream into the churn. Plug it in and come back in twenty minutes.
 |
| Note that the cream comes just below the band in the glass. |
8:10ish start time, at 8:30ish it should be done.

Check the clock: twenty minutes! Notice how the butter is above the band in the glass. That's why the one and a half gallons of cream is the perfect amount to start with...it GROWS! The butter is on the top.
 |
Cheese cloth is draped across a colander and that is sitting on top of a stock pot. This is the point where the buttermilk gets strained so that just the butter is left.

Oops! A very important step is to smash down the cheese cloth into the colander. If you don't, the buttermilk and butter will just spill out everywhere! Pour slowly and pile all the butter up.

The first batch of lovely fluffy butter in the colander!

The buttermilk drips through the cheese cloth and into the stock pot.

Then, the buttermilk gets jarred and packaged later for sale. This buttermilk is called "sweet" buttermilk and is TOTALLY different than buttermilk from the grocery. Buttermilk from the grocery is cultured, salty, tangy. This is not. This buttermilk is a delicious drink as is! (Mix in some farm fresh honey for a crazy good treat!) It can also be used in cooking just like store bought buttermilk.
 |
| At the end, five and a half gallons of cream yielded two gallons of buttermilk. |
The next step in the process is the rinsing. Yes. Rinsing. The left over buttermilk that gets trapped with the butter is what sours and caused the butter to go bad quickly. So, it needs to be rinsed out. Fill the stock pot with some cool water and break apart the butter to allow the water to rinse all of the buttermilk out. Strain again through the cheese cloth. Do this step over and over until the water becomes mostly clear. In the following pictures you can see that the first rinse has very milky water, the second rinse has less milky water, and the third rinse has mostly clear water. (The wash water doesn't go to waste either! We save that for the hogs.)
 |
 |
| Second Rinse |
 |
| Third and Final Rinse |
Now, is the labor intensive part! There is a lot of water that must now be removed. Using the Scotch hands, pick up about 1/4 cup of butter and work it back and forth between the two paddles. For many years I did this part with my actual hands. But, on hot summery days (like today) the room temperature and my body temperature made this water removal step a huge mess and not very successful.

Work this until all of the water has been removed. Do this over the sink because A LOT of water comes out!
 |
| Note the bottom of the left paddle, you can see how the water runs down 'n' out through the channels and down your arms and off your elbows.... |
Once all of the water has been removed, the butter is ready to be packaged into half pound containers.
 |
| Right on the dot! |
 |
| FORTY FIVE Packages of Butter |
A day well spent! And, I love being able to say that I was THEE ONLY person in the whole entire city of Tampa who made 23 lbs. of farm fresh butter today. I know that because this is the only farm within the city limits of Tampa and I was the only one there.
No comments:
Post a Comment